18 DIY Bushcraft Shelter Ideas in the Woods: Build Your Perfect Survival Haven
Building your own bushcraft shelter in the woods is a fantastic way to immerse yourself in nature and test your survival skills.
Whether you’re preparing for a camping trip or just enjoy the challenge of creating shelter with natural materials, these DIY bushcraft shelter ideas will help you craft a comfortable, secure, and functional space out of nothing but what you can find around you.

Let’s explore 18 ideas that can turn your wilderness experience into a memorable adventure.
Contents
- 0.1 1. The Lean-To Shelter
- 0.2 2. The A-Frame Shelter
- 0.3 3. The Debris Hut
- 0.4 4. The Tarp Shelter
- 0.5 5. The Quinzhee Shelter
- 0.6 6. The Teepee Shelter
- 0.7 7. The Snare Trap Shelter
- 0.8 8. The Bivouac Shelter
- 0.9 9. The Shelter from Tree Boughs
- 0.10 10. The Hut on Stilts
- 0.11 11. The Cave Shelter
- 0.12 12. The Log Cabin Shelter
- 0.13 13. The Underground Shelter
- 0.14 14. The Pallet Shelter
- 0.15 15. The Hammock Shelter
- 0.16 16. The Log Shelter
- 0.17 17. The Trellis Shelter
- 0.18 18. The Birchbark Shelter
- 1 FAQs
1. The Lean-To Shelter

The lean-to shelter is one of the simplest and most effective bushcraft shelters.
By leaning branches against a sturdy framework, you create a slanted roof that sheds rain effectively.
Use leaves and grass as insulation for added warmth. This shelter works well for short-term use, offering both protection from the elements and a good night’s sleep.
2. The A-Frame Shelter

An A-frame shelter is a bit more robust than the lean-to but still relatively easy to construct. It’s built by leaning two long, sturdy branches against each other in the shape of an “A.”
You then cover the frame with additional branches, leaves, or a tarp for protection.
This structure provides excellent stability, keeping you dry and protected during storms.
3. The Debris Hut
If you’re looking for a low-impact shelter, the debris hut is a great option. Construct it by creating a frame using small branches and covering it with a thick layer of leaves, pine needles, or grass.
This shelter is excellent for warmth because the dense debris layer traps heat effectively. It’s perfect for cold environments or when you’re in need of extra insulation.
4. The Tarp Shelter

A tarp shelter is one of the easiest bushcraft shelters to set up and provides excellent protection from the rain.
Use trees to anchor your tarp and create a makeshift roof that can shield you from weather.
With the ability to adjust its size and configuration, a tarp shelter is incredibly versatile for various conditions.
5. The Quinzhee Shelter

The quinzhee shelter is a classic winter bushcraft shelter that’s built by piling snow into a large mound and then hollowing it out.
If you’re in an area with abundant snow, this shelter provides excellent insulation and is surprisingly warm.
Make sure to leave a ventilation hole at the top to avoid carbon monoxide buildup.
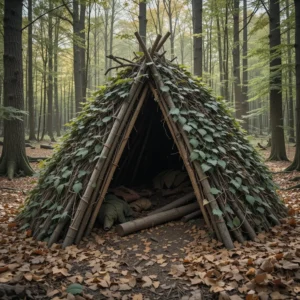
6. The Teepee Shelter

Inspired by traditional Native American teepees, this shelter is made from long poles that are leaned together at a central point to form a cone shape.
Once the frame is set up, cover it with natural materials or a tarp to make it weatherproof.
The teepee shelter is ideal for keeping you dry and protected in even the harshest conditions.
7. The Snare Trap Shelter

For the ultimate in stealth and survival, build a snare trap shelter. This shelter uses a snare trap as the central feature to trap small animals for food, while also using sticks and leaves to form a safe haven.
While it’s a bit more complex, this shelter can be incredibly useful in long-term survival situations.
8. The Bivouac Shelter

For a minimalist approach, the bivouac shelter is lightweight and can be set up quickly. It usually involves a simple tarp or emergency blanket with a basic frame to protect you from the wind and rain. This shelter is best for short-term use or in emergency situations where you need shelter fast.
9. The Shelter from Tree Boughs

A unique and efficient bushcraft shelter is made by using tree boughs. Gather branches from trees, and use them to create a structure on the ground.
Place more branches on top to form a roof, and then add additional layers of leaves and pine needles to keep the shelter insulated.
10. The Hut on Stilts

If you’re working in an area prone to flooding, you can build a hut on stilts. Using strong tree branches or logs, elevate your shelter above the ground to avoid dampness and potential flooding.
The stilts provide better airflow and dryness, keeping the shelter cool and dry in wet conditions.
11. The Cave Shelter

If you’re lucky enough to find a natural cave or rock overhang, this can be an ideal place to set up your shelter.
You’ll be sheltered from the elements and can focus on maintaining a fire for warmth. Add some extra insulation in the form of leaves or furs to create a cozy, secure home base.
12. The Log Cabin Shelter

A log cabin shelter is a more permanent structure that’s built using logs from nearby trees.
Stack the logs to create walls and cover the roof with branches or other materials.
This structure provides excellent insulation and can be used for longer-term shelter in the woods.
13. The Underground Shelter

An underground shelter, or earth shelter, involves digging a hole in the ground and covering it with branches, dirt, or leaves.
This type of shelter helps maintain a stable temperature, keeping you cool in the summer and warm in the winter. It’s also a great way to stay hidden if you need to go unnoticed.
14. The Pallet Shelter

Using discarded wooden pallets can create an easy yet sturdy shelter. Simply stack the pallets on top of each other to form walls, then use tarps, blankets, or branches for the roof.
This shelter is quick to build and provides protection from the elements without requiring much effort.
15. The Hammock Shelter

If you’re in a warm climate, you can use a hammock shelter for sleeping. Simply string up a hammock between two trees and cover it with a tarp or poncho.
This shelter is excellent for rain protection, and it provides excellent airflow, which is ideal for hot weather.
16. The Log Shelter

The log shelter involves using large logs to create a base, walls, and a roof. Stack the logs on the ground to form a sturdy structure and cover the roof with branches or a tarp.
This shelter is durable and provides great protection in harsh weather conditions.
17. The Trellis Shelter

For a more creative shelter, consider building a trellis shelter. Create a framework using branches or vines and allow nature to take over.
You can cover the trellis with vines, leaves, and other materials to form a leafy, camouflaged shelter that blends in with the surrounding woods.
18. The Birchbark Shelter

If you’re in a forest with birch trees, you can use birch bark as a natural material for shelter construction.
Birch bark is water-resistant and durable, making it a great material for building both the roof and walls of your shelter. Simply gather the bark and attach it to a wooden frame.
FAQs
What materials are best for building a bushcraft shelter?
Natural materials like branches, leaves, grass, and bark are ideal for building a bushcraft shelter. These materials are abundant and help to create an insulated and durable shelter.
How long does it take to build a bushcraft shelter?
Building a simple shelter like a lean-to can take a couple of hours, while more complex shelters like log cabins may take several days. The time required depends on the shelter design and the materials available.
How do I stay warm in a bushcraft shelter?
To stay warm, insulate your shelter with layers of leaves, pine needles, or grass. Additionally, building a fire outside or inside (in a safe and controlled manner) can provide heat.
Can I build a shelter without any tools?
Yes! Many bushcraft shelters can be built using only your hands and natural materials. However, having a knife or saw can make the process much faster and more efficient.
How do I ensure my shelter is waterproof?
To keep your shelter dry, cover the roof with a thick layer of branches and leaves, and ensure that the ground underneath is sloped to allow rainwater to drain away. A tarp or plastic sheet can also be used as waterproof material.
Final Thoughts
Building a DIY bushcraft shelter in the woods can be a rewarding and empowering experience.
Whether you’re preparing for a survival scenario or just want to spend a night in nature, these shelter ideas will provide you with a wide range of options.
From simple lean-tos to more elaborate log cabins, there’s a shelter idea for every skill level and environment.
As a retired firefighter, I’ve always enjoyed crafting these shelters to help others understand the importance of being resourceful in nature.
Remember to always practice safety, respect the environment, and build shelters that are sustainable.

Hi, I m Aaron Smith, a firefighter, and creator of Firefighterline.com, a website that provides top-notch training courses for firefighting organizations. After completing my studies, I quickly rose through the fire service ranks, eventually becoming Captain at one of the busiest fire departments in the state.